Setting up an Ubuntu EC2 instance
- Disturbed Rover

- Sep 18, 2020
- 4 min read
Updated: May 22, 2024
In this, you will learn how to create an EC2 Ubuntu virtual machine.

Here EC2 stands for Elastic Cloud Compute which is nothing but a virtual machine in Amazon Web Services Terminology. It is a cloud computing service in which an AWS subscriber can request and provision a computer server in the AWS cloud.
There are three types you can choose EC2 instance
On-Demand Instance
Reserved Instance
Spot Instance
Dedicated Host
We are using On-Demand instance, these instances let you pay for computing capacity by the hour with no long commitments or upfront payments. You can increase or decrease your compute capacity depending upon the demands of your applications and pay the specified hourly rate for the instances you use. Follow these steps:
Login and access to AWS services:-

Enter your password:-

The main AWS dashboard:-

This is your main dashboard where all the AWS services are. If you want any other service then you will find it here.
Click on the EC2 in the compute section of your dashboard.

Here is the EC2 dashboard. Here you will get all the information in the gist about the AWS EC2 resource running.
on the top right corner of the EC2 dashboard, choose the AWS region in which you want to provision the EC2 server. We have selected the Mumbai region.
Now click on the button which says launch instance.
Choose AMI:-
We have to choose an AMI for our proceedings(An AMI is an Amazon machine image, you can say its a template of the operating system of which you are building a server.
Now let's choose our AMI as we going to work on the ubuntu we have to select ubuntu.

Choose Ubuntu Server 18.04 Lts to proceed.
Choose Instance Type
Here we are going to choose the t2 micro instance type. The selection of instance types is completely based on your applications you run on your server.
Here the t2 micro has 1v CPU and 1GB memory

Now click on the configure instance details.
Configure Instance:-

In the first checkbox, you have to put a number of instances you want to make you can make up to 20 instances at a time.

The second option shows you want to launch a spot instance rather than on-demand instances.

Here the third option is the network that tells you in which VPC(virtual private cloud) you want to launch your network.

Also, you should have a preplanned subnetting. Or you can create a subnetting but I suggest you that you should have a build it before.
But for the time being, we don't deal with subnetting.

In this column, select enable or disable according to the above selection.

Select none under the section of the IAM(IAM role is the identity that you can create in your account that has specific permission) role. We will discuss it later.

The next option is shutdown behavior - when you accidentally shutdown your instance then you don't want it to be deleted but stopped.

Under Monitoring- you can enable Detailed Monitoring if your instance is a business-critical instance. Here we have kept the option unchecked. AWS will always provide Basic monitoring on your instance free of cost. We will visit the topic of monitoring in the AWS Cloud Watch part of the tutorial.

Now click add storage.
Add Storage:-
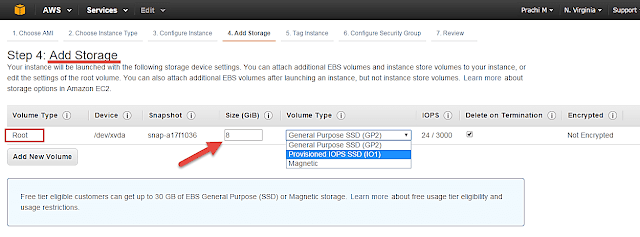
Hereby default, the occupied storage is 8GB you can change it according to you, three types of storage are present general-purpose, magnetic, and provisioned IOPS.
Now click on add tags.

You can add tags if you want your tag is your key-value pair. this gives visibility to the administrator when there are a lot number of instances.
ADD SECURITY GROUP:-

creating a new Security Group
Naming our SG for easier reference
Defining protocols which we want to be enabled on my instance
Assigning IPs which are allowed to access our instance on the said protocols
Once, the firewall rules are set- Review and launch.
REVIEW INSTANCE:-

Review your settings and click on the launch.
CREATING A NEW KEY PAIR:-

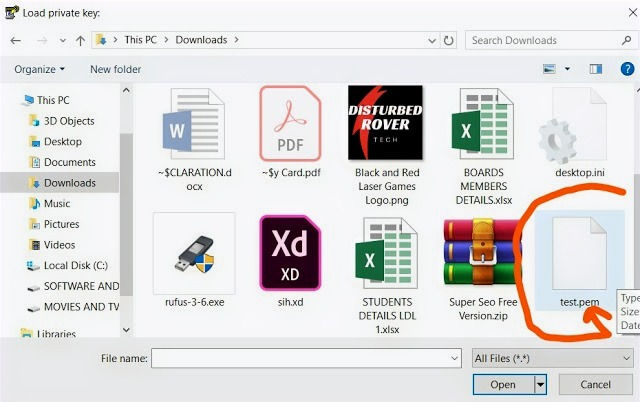
Give the name of your key pair and download the key pair. keep it carefully. It the .pem file you have downloaded. Creating PPK files:-
open puttygen on your system
click on load
select the .pem file that you have downloaded
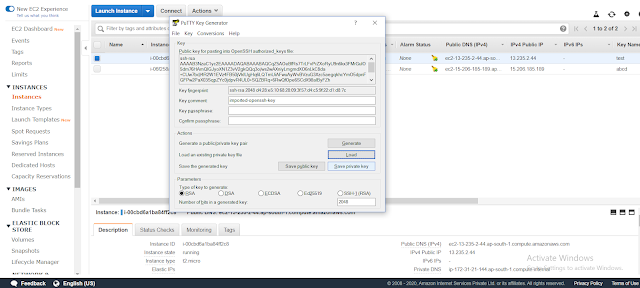
Now click on save private key and again yes don't cancel it.
it will give you a .ppk extension file which we use to connect with a server in the next step
Connecting with the server:-

open putty, not puttygen
paste your IP of the server in the given form field
now go to left sidebar select ssh
under ssh click on AUTH
browse button.
select the .ppk extension file.
and click open
You will get the screen like this:-

Type ubuntu into that terminal section.

BOOm now you are in your server terminal.
SUMMARY:-
here we have created a ubuntu server of 1gb memory and 8gb space based on AWS technology, using puttygen and putty to connect with our server. Thank You. If you have any problem leave a comment.


Comments